CORS with Spring (MVC, Security)
by Green Frog Developer
이번 포스팅에서는 CORS with Spring (MVC, Security)에 대해서 다루어 보도록 하겠다.
프로젝트 진행간에 CORS(Cross-Origin Resource Sharing) 이슈를 경험하고 대략 두달이 지나서야 이 글을 작성한다. 다른 일들에 밀려 이제 글을 작성하는 것이 조금 못마땅하기도 하지만 블로깅을 놓지 않고 열심히 하는 내 모습이 대견하기도 하다.
어쨋든 이 포스팅의 목적은 Spring에서 CORS이슈를 해결하는 방법에 대해서 알아보기로 한 것이니 CORS란 무엇이고, 왜 나왔는지에 대해서 먼저 알아보도록 하자~
매번 느끼는 거지만, 무언가를 배우기 앞서 본질을 파악하는 것이 가장 중요한 것 같다.
CORS란 무엇인가?
CORS란 Cross-Origin Resource Sharing의 약자이다. 영어 그대로 해석해 보면 교차 출처 리소스 공유이다. 즉, 한 출처에서 실행중인 웹 애플리케이션이 다른 출처의 선택한 자원에 접근할 수 있는 권한을 부여하도록 브라우저에 알려주는 정책이다.
그렇다면 출처(Origin)이란 무엇일까?
도메인 + 프로토콜 + 포트를 통틀어 출처(Origin)이라고 한다. 이 글에서는 출처를 오리진 or Origin이라고 부르도록 하겠다.
즉, 프로토콜, 포트, 호스트(도메인) 중 서로 하나라도 다를 경우 Cross Origin이라고 이해하면 된다.
ex) http://localhost:8080/api 와 https://localhost:8080/api 은 Cross Origin이다. (프로토콜이 다르기 때문)
이제 CORS가 무엇인지에 대해서 알아보았음으로, 왜 CORS가 나오게 되었는지에 대해서 알아보도록 하자.
CORS는 왜 필요한가?
보안 상의 이유로, 브라우저는 스크립트에서 시작한 Cross Origin HTTP Request를 제한한다.
ex)
XMLHttpRequest와Fetch API는 동일 출처 정책(SOP)을 따른다.
즉, 이 API를 사용하는 웹 애플리케이션은 자신의 Origin과 동일한 리소스만 불러올 수 있으며, 다른 Origin의 리소스를 불러오려면 그 Origin에서 올바른 CORS 헤더를 포함한 응답을 반환해야만 한다.
동일 출처 정책 (Same-Origin Policy)
불러온 문서나 스크립트가 다른 출처(Origin)에서 가져온 리소스와 상호작용하는 것을 제한하는 중요한 보안 방식입니다. 이것은 잠재적 악성 문서를 격리하여, 공격 경로를 줄이는데 도움이 됩니다.
결국 대부분의 웹 어플리케이션의 Web API Client는 XMLHttpRequest 또는 Fetch API를 사용하기 떄문에 Cross Origin HTTP Request를 위해선 CORS 정책을 따라야만 한다.
CORS란 무엇이고, 왜 필요한지에 대해서 알아보았으니, 우리는 Cross-Origin HTTP Request 간에 발생하는 여러 시나리오에 대해서 알아보도록 하자.
접근 제어 시나리오
- Simple Request (단순 요청)
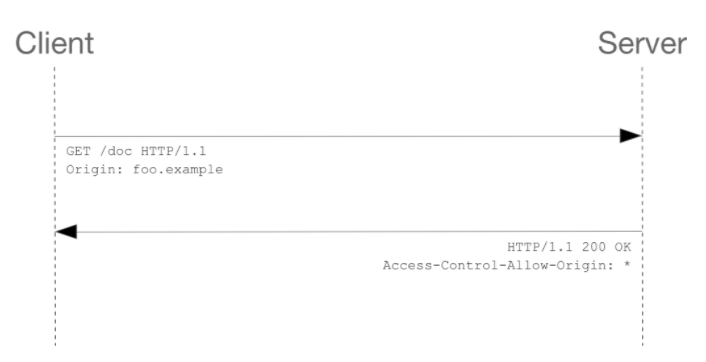
- Simple Request 조건을 모두 충족하는 요청을 Preflight request 없이 보내 서버는 이에 대한 응답으로 Access-Control-Allow-Origin 헤더를 응답하는 방식
- Access-Control-Allow-Origin : <origin> | *
- Origin을 지정하여 브라우저가 해당 Origin이 리소스에 접근하도록 허용한다. Credential이 없는 요청의 경우 "*" 와일드 카드는 브라우저의 origin에 상관없이 모든 리소스에 접근하도록 허용한다.
- The Communication between client and server using simple request

- preflighted request (프리플라이트 요청)
- 먼저
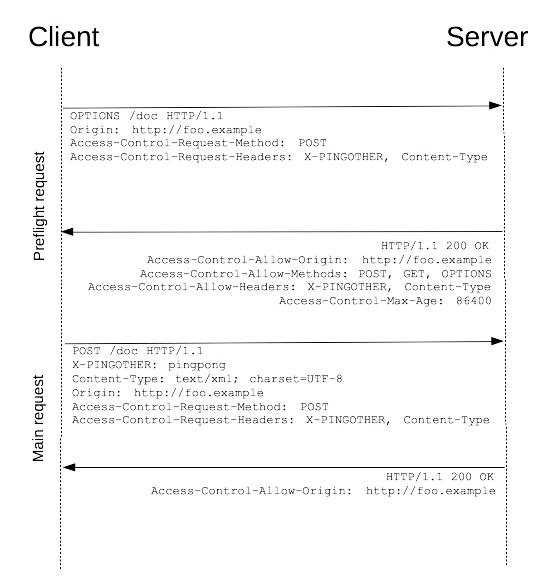
OPTIONS메서드를 통해 다른 도메인의 리소스로 HTTP request를 보내 실제 요청이 전송하기에 안전한지 확인한다. Cross-site request는 유저 데이터에 영향을 줄 수 있기 때문에 이와 같이 미리 전송(preflighted)한다. - The Communication between client and server using preflighted request

- Access-Control-Request-Method: <method>
- Access-Control-Request-Method 헤더는 실제 요청에서 어떤 HTTP 메서드를 사용할지 서버에게 알려주기 위해, preflight request 할 때에 사용된다.
- Access-Control-Allow-Methods: <method>[, <method>]*
- Access-Control-Allow-Methods 헤더는 리소스에 접근할 때 허용되는 메서드를 지정한다. 이 헤더는 preflight request에 대한 응답으로 사용된다.
- Access-Control-Request-Headers: <header-name>[, <header-name>]*
- Access-Control-Request-Headers 헤더는 실제 요청에서 어떤 HTTP 헤더를 사용할지 서버에게 알려주기 위해, preflight request 할 때에 사용된다.
- Access-Control-Allow-Headers: <header-name>[, <header-name>]*
- preflight request 에 대한 응답으로 Access-Control-Allow-Headers 헤더가 사용된다. 실제 요청시 사용할 수 있는 HTTP 헤더를 나타낸다.
- 먼저
- credentialed request (인증정보를 포함한 요청)
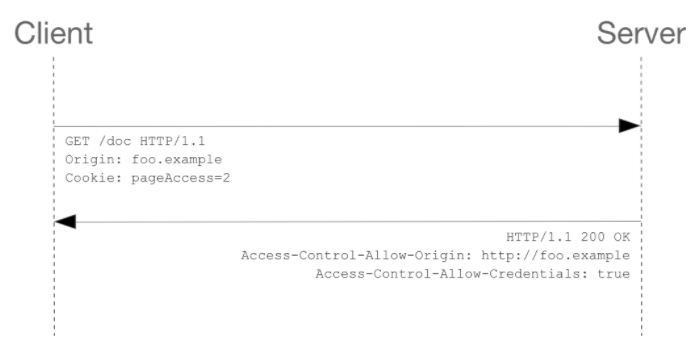
- credentialed requests는 HTTP cookies 와 HTTP Authentication 정보를 인식한다. 기본적으로 cross-site
XMLHttpRequest나 Fetch 호출에서 브라우저는 자격 증명을 보내지 않는다. XMLHttpRequest 객체나 Request 생성자가 호출될 때 특정 플래그를 설정해야만 한다. - Access-Control-Allow-Credentials: true 로 응답하지 않으면, 응답은 무시되고 웹 컨텐츠는 제공되지 않는다.
- The Communication between client and server using credentialed request

- Access-Control-Allow-Credentials: true
- Access-Control-Allow-Credentials 헤더는 credentials 플래그가 true일 때 요청에 대한 응답을 표시할 수 있는지를 나타낸다.
- credentialed requests는 HTTP cookies 와 HTTP Authentication 정보를 인식한다. 기본적으로 cross-site
CORS에서 발생할수 있는 접근 제어 시나리오에 대해서 알아보았다. 이제는 스프링에서 어떻게 이러한 접근 제어 시나리오를 적절히 활용하는지에 대해서 알아보자!
CORS Configuration in Spring
Spring에서 CORS 정책을 따르기 위한 설정에 대해서 알아보도록 하자!!
나의 프로젝트에서는 Sprint Security와 MVC 모두 사용하였음으로 CORS를 위해서 Security와 MVC 설정이 모두 필요하였다.
CORS with Spring Security
Spring Security에서 CORS를 다루는 가장 확실하고 쉬운 방법은 CorsFilter를 사용하는 것이다. 사용자는 다음과 같이 CorsConfigurationSource를 제공하여 CorsFilter를 Spring Security와 통합 할 수 있다.
Spring Security 사용시 CORS에 걸리지 않으려면 Authentication Filter 인증 보다 앞단계의 필터/인터셉터에서 path 검증로직이 일어나야만 한다.
The CORS configuration in Spring Security
@EnableWebSecurity
public class WebSecurityConfig extends WebSecurityConfigurerAdapter {

	@Override
	protected void configure(HttpSecurity http) throws Exception {
		http
            // by default uses a Bean by the name of corsConfigurationSource
			.cors().and()
			...

    // You can configure allowed Origin, Method, Header and Credential
    // and how long, as a duration, the response from a pre-flight request can be eached by clients
	@Bean
	CorsConfigurationSource corsConfigurationSource() {
		CorsConfiguration configuration = new CorsConfiguration();
		configuration.setAllowedOrigins(Arrays.asList("https://example.com"));
		configuration.setAllowedMethods(Arrays.asList("GET","POST"));
        // you can configure many allowed CORS headers

		UrlBasedCorsConfigurationSource source = new UrlBasedCorsConfigurationSource();
		source.registerCorsConfiguration("/**", configuration);
		return source;
	}
}
CORS with Spring MVC
Spring MVC에서 CORS를 적용하는 방법은 크게 총 2가지로 나뉜다.
- 부분적으로 컨트롤러에서 CORS를 설정하는 방법 (Annotation based)
- 전역적으로 Spring MVC 설정에서 CORS를 설정하는 방법
컨트롤러에서 부분적으로 CORS를 설정하는 방법
Handler 메소드에 @CrossOrigin 애노테이션을 붙이는 방법
@RestController
@RequestMapping("/account")
public class AccountController {

    @CrossOrigin
    @RequestMapping(method = RequestMethod.GET, path = "/{id}")
    public Account retrieve(@PathVariable Long id) {
        // ...
    }

    @RequestMapping(method = RequestMethod.DELETE, path = "/{id}")
    public void remove(@PathVariable Long id) {
        // ...
    }
}
- 모든 Origin이 허용되고
- @RequestMapping 애노테이션에서 명시되어진 HTTP 메소드가(GET Method) 허용된다.
- preflight 응답이 캐시되어지는 시간은 30분이다.
Controller에 @CrossOrigin 애노테이션을 붙이는 방법
@CrossOrigin(origins = "http://example.com", maxAge = 3600)
@RestController
@RequestMapping("/account")
public class AccountController {

    @RequestMapping(method = RequestMethod.GET, path = "/{id}")
    public Account retrieve(@PathVariable Long id) {
        // ...
    }

    @RequestMapping(method = RequestMethod.DELETE, path = "/{id}")
    public void remove(@PathVariable Long id) {
        // ...
    }
}
클래스 레벨에 @CrossOrigin 애노테이션을 추가 했고, 해당 컨트롤러에 속해있는 두 핸들러 메소드 모두에게 클래스 레벨에서 설정한 CORS정책이 적용된다.
@CrossOrigin 애노테이션을 통해 origins, methods, allowedHeaders, exposedHeaders, allowCredentials, maxAge 모두 설정할 수 있다.
클래스 레벨과 메소드 레벨 모두에게 @CrossOrigin 애노테이션을 붙이는 방법
@CrossOrigin(maxAge = 3600)
@RestController
@RequestMapping("/account")
public class AccountController {

    @CrossOrigin("http://example.com")
    @RequestMapping(method = RequestMethod.GET, "/{id}")
    public Account retrieve(@PathVariable Long id) {
        // ...
    }

    @RequestMapping(method = RequestMethod.DELETE, path = "/{id}")
    public void remove(@PathVariable Long id) {
        // ...
    }
}
클래스 레벨의 @CrossOrigin 애노테이션이 기본으로 적용되고 핸들러 메소드의 @CrossOrigin 애노테이션이 추가로 적용된다.
Spring MVC 설정에서 전역적으로 CORS를 설정하는 방법
부분적으로 컨트롤러 마다 설정하는 애노테이션 기반 설정의 대안으로 Spring은 컨트롤러 외부에서 전역으로 CORS 설정을 할 수 있게 해준다. 이는 필터 기반 솔루션을 사용하는 것과 유사하지만 Spring MVC 내에서 선언하고 @CrossOrigin 설정과 결합할 수 있다.
JavaConfig를 통해 CORS 전역 설정
@Configuration
@EnableWebMvc
public class WebConfig implements WebMvcConfigurer {
    @Override
    public void addCorsMappings(CorsRegistry registry) {
        registry.addMapping("/**");
                .allowedOrigins("http://www.example.com")
                .allowedMethods("*")
                .allowCredentials(false)
                .maxAge(3000);
    }
}
위의 JavaConfig를 통해 paths, origins, methods, allowedHeaders, exposedHeaders, allowCredentials, maxAge 모두 설정할 수 있다.
XML을 통해 CORS 전역 설정
<mvc:cors>
    <mvc:mapping path="/api/**"
        allowed-origins="http://domain1.com, http://domain2.com"
        allowed-methods="GET, PUT"
        allowed-headers="header1, header2, header3"
        exposed-headers="header1, header2" allow-credentials="false"
        max-age="123" />

    <mvc:mapping path="/resources/**"
        allowed-origins="http://domain1.com" />
</mvc:cors>
위의 XMLConfig를 통해 paths, origins, methods, allowedHeaders, exposedHeaders, allowCredentials, maxAge 모두 설정할 수 있다.
Integration CORS configuration with Spring MVC and Security
만약 Spring MVC의 CORS 지원을 사용한다면, Spring Security의 CorsConfigurationSource 설정을 생략(omit)할 수 있다. Spring Security는 Spring MVC에서 제공되어지는 CORS 설정을 활용(leverage)할 것이다.
여기까지 CORS에 대해서 알아 보았다!!! 아래의 자료는 이 글을 작성하면서 참고한 문서이니 독자 여러분들도 참고 바란다.
https://www.baeldung.com/spring-cors
https://docs.spring.io/spring-security/site/docs/4.2.x/reference/html/cors.html
Subscribe via RSS
